STICKER CREATION GUIDE
The Counter-Strike sticker system supports a variety of real-world sticker manufacturing styles and visual appearances. This document covers the following topics:
- - Technical features of the sticker material system
- - How to preview and edit your custom sticker materials
- - How to submit finished sticker artwork to the CS:GO workshop
Different types of stickers
The following types of stickers can be created using the sticker materials just by setting a few custom material properties. Possible sticker types currently include:
- - Standard glossy stickers
- - Paper-backed glossy stickers
- - Color-replace pattern graphics or graffiti tags
- - Embossed foil or metal leaf stickers
- - Holographic stickers
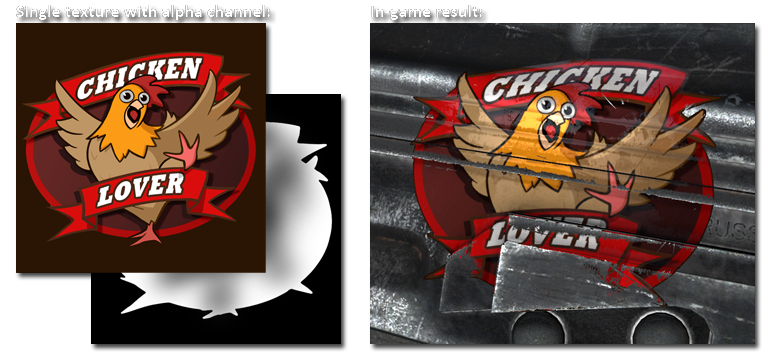
Some stickers require only one texture, and stickers tend to look best with crisp, clear lines and colors.
Note: You don't have to put any scratches or grime in the sticker texture - wear effects are added automatically.

Creating a Valve Material (VMT)
You will need to create a new VMT for each sticker you create. The VMT contains the material parameters and settings that define how your sticker looks.
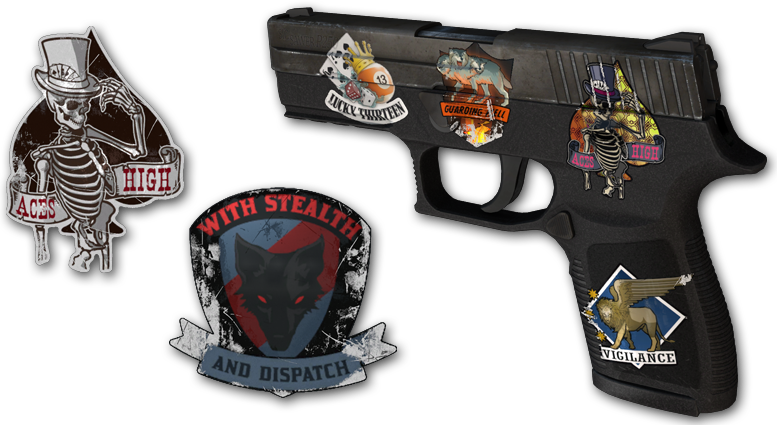
Here's an example sticker VMT. This particular example defines the "Aces High" sticker:
WeaponDecal
    {
        $basetexture models\\weapons\\customization\\stickers\\standard\\aces_high
        $decalstyle 1 // standard paper-backed plastic sticker
        $envmap \"env_cubemap\"
        $envmaptint \"[ .07 .07 .07 ]\"
        $phong 1
        $phongexponent 2
        $phongfresnelranges \"[ .2 .5 1 ]\"
        $phongalbedotint 1.0
        $phongboost 1.0
        $phongalbedoboost 10.0
    }
Common material parameter documentation can be found here on the Valve Developer Wiki. Some material parameters are unique to the CS:GO sticker shader and will be explained in detail in this document.
Sticker Editing Setup
The easiest way to start creating and editing new stickers is to use the CS2 Model Viewer, available in the Counter-Strike SDK.CS:GO includes some helper models for previewing sticker materials. Open sticker_preview.mdl:
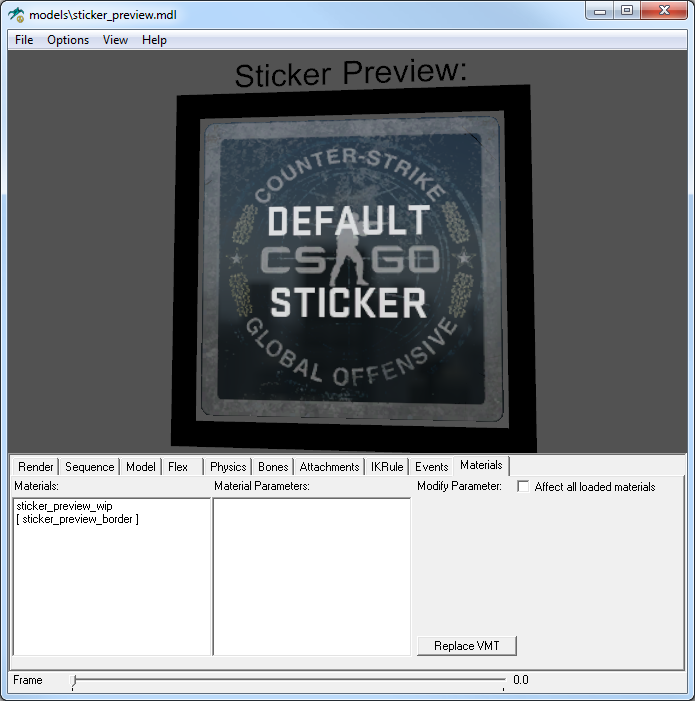
By selecting the 'Materials' tab you can select and temporarily replace the sticker preview model material with your custom sticker VMT. This will allow you to see what your sticker material looks like.
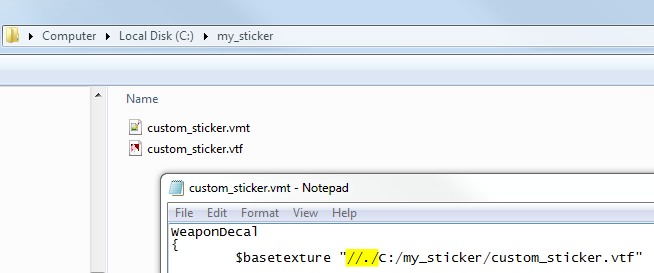
Note: Your VMT may need to specify VTF texture paths using the absolute path prefix in order to load VTF textures correctly:
In the Model Viewer, select the "sticker_preview_wip" material in the materials list, then click the "Replace VMT" button. Then browse to and select your VMT. Always remember to save all changes to your external VMT file. Any adjustments you make within the Model Viewer are temporary and won't be automatically saved.
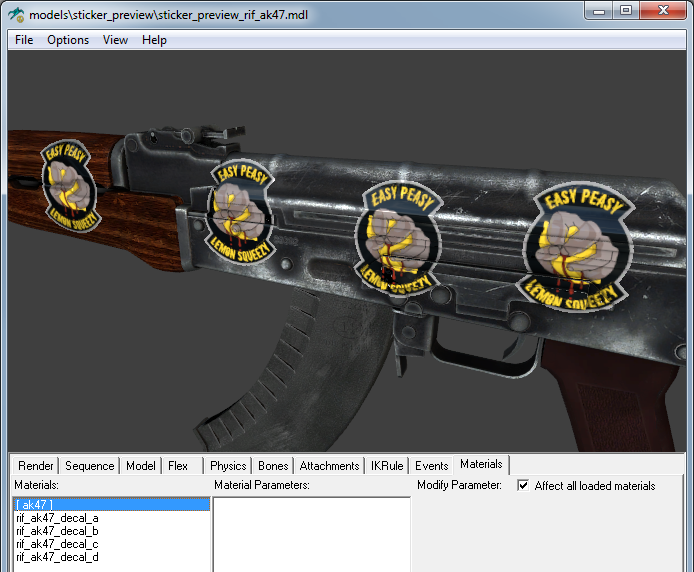
If you want to see what your sticker will look like on a weapon, a selection of weapon models is provided in models/sticker_preview. Just like the square sticker preview, the materials on these preview weapons can be replaced:
Sticker Styles
The $DecalStyle VMT parameter controls which of the available style presets the sticker uses. Each style works differently, and are explained in the following document sections:Glossy Stickers
This style requires only one texture with an alpha channel.
To make a standard glossy sticker, set $DecalStyle 0 in the sticker material:
WeaponDecal
{
    $DECALSTYLE 0 // glossy sticker style
    $basetexture models\weapons\customization\stickers\examples\sticker_chickenlover
    $unwearstrength 0.16
    $envmap "env_cubemap"
    $envmaptint "[ .07 .07 .07 ]"
    $phong 1
    $phongexponent 2
    $phongfresnelranges "[ .2 .5 1 ]"
    $phongalbedotint 1.0
    $phongboost 1.0
    $phongalbedoboost 10.0
}
UnWear Strength
To define these important areas, paint values greater than 30 (out of 255) into the alpha channel, like the example below.
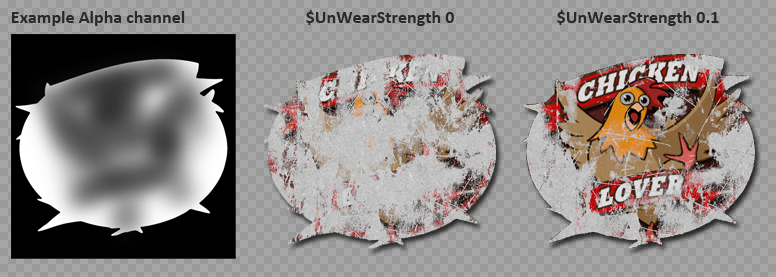
You can define how strongly the wear effect is undone by adjusting $unwearstrength in the material, which defaults to 0.1, or a 10% influence of your painted value on the wear amount.
Glossy Paper-Backed Stickers
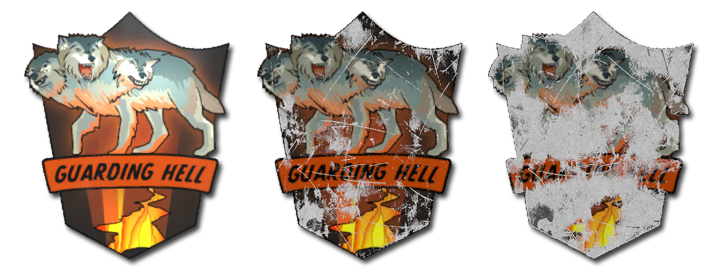
To make a standard glossy paper-backed sticker, set $DecalStyle 1:
WeaponDecal
{
    $DECALSTYLE 1 //Paper-backed glossy sticker style
    $basetexture models\weapons\customization\stickers\sticker_wolves
    $unwearstrength 0.1
    $envmap "env_cubemap"
    $envmaptint "[ .07 .07 .07 ]"
    $phong 1
    $phongexponent	2
    $phongfresnelranges "[ .2 .5 1 ]"
    $phongalbedotint 1.0
    $phongboost 1.0
    $phongalbedoboost 10.0
}
Color-Replace Stickers
$ColorTint color
$ColorTint2 color
$ColorTint3 color
$ColorTint4 color
Color replace stickers use a mask texture so they can be re-colorized in nearly infinite combinations. One way to think about how the tint colors are combined is to imagine the texture as a series of layers applied in order from bottom to top:
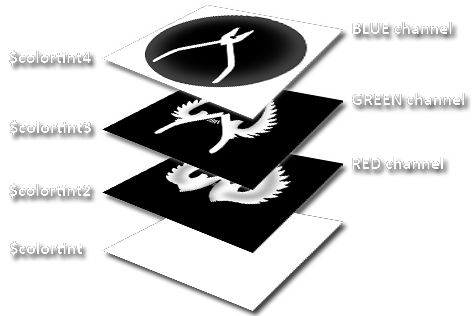
The image starts with a base color defined by $ColorTint. The first layer (RED mask channel) can change that base color into $ColorTint2. The second layer (GREEN mask channel) can change anything underneath it to $ColorTint3. The top layer (BLUE mask channel) changes anything underneath it to $ColorTint4.
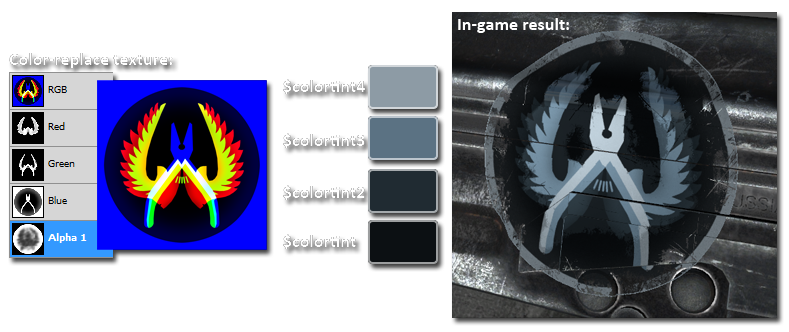
All sticker styles (including color-replace stickers) support UnWearStrength in their alpha channel to preserve important areas of the sticker image.
WeaponDecal
{
    $DECALSTYLE 2 //color-replace sticker style
    $basetexture models\weapons\customization\stickers\examples\ct_logo
    $colortint "[ 12 16 19 ]"
    $colortint2 "[ 32 43 50 ]"
    $colortint3 "[ 91 114 131 ]"
    $colortint4 "[ 141 155 165 ]"
    $unwearstrength 0.2
    $envmap "env_cubemap"
    $envmaptint "[ .07 .07 .07 ]"
    $phong 1
    $phongexponent	2
    $phongfresnelranges "[ .2 .5 1 ]"
    $phongalbedotint 1.0
    $phongboost 1.0
    $phongalbedoboost 10.0
}
Embossed Foil Stickers
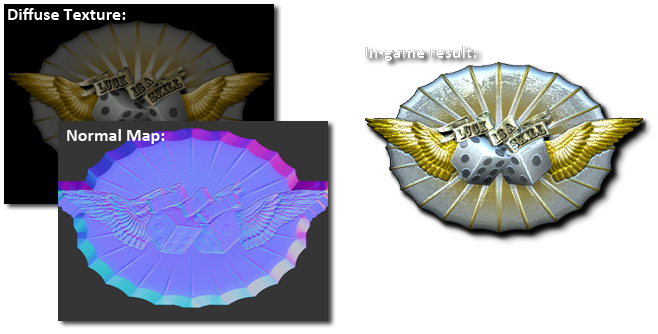
    WeaponDecal
    {
        $DECALSTYLE 4 // embossed foil
        $basetexture models\weapons\customization\stickers\standard\luck_foil
        $normalmap	 models\weapons\customization\stickers\standard\luck_foil_normal
        $unwearstrength 0.08
        $envmap "env_cubemap"
        $envmaptint "[ 25 25 25 ]"
        $phong 1
        $phongexponent	0.1
        $phongfresnelranges "[ 1 1 1 ]"
        $phongalbedotint 1.0
        $phongboost 40.0
        $phongalbedoboost 2.0
    }
Holographic Stickers
$HoloMask texturepath
$HoloSpectrum texturepath
Holographic stickers are standard paper-backed stickers that use two additional textures to create a holographic light warping effect:


The $holomask texture defines what holographic effects are applied to certain parts of the sticker:

The $holomask RED channel masks what areas of the basetexture have holographic effects applied. Areas not included in this channel will use the basetexture color instead, as if those areas were still part of a regular paper-backed sticker.

The $holomask GREEN channel defines a warp pattern that will offset the horizonal sampling position from the HoloSpectrum texture. Note how the spectrum color distortion follows the information in this channel:

The $holomask BLUE channel defines the vertical offset read from the HoloSpectrum texture. This can be used to create custom tinting or other special spectrum-based effects. Note how the lower areas of the spectrum texture feature desaturated regions. The whiter this $holomask BLUE channel, the lower the color drawn from the spectrum. This allows some areas of the hologram to feature different colors, hues, or saturation.

The $holospectrum texture defines the color of the light warping effect at different viewing angles. You can either reference the default spectrum in a new holographic sticker material, or create a new one if you need custom color effects.

WeaponDecal
{
    $DECALSTYLE 3 //hologram
    $basetexture models\weapons\customization\stickers\examples\bish
    $holomask models\weapons\customization\stickers\examples\bish_holomask
    $holospectrum models\weapons\customization\stickers\default\holowarp_default
    $unwearstrength 0.1
    $envmap "env_cubemap"
    $envmaptint "[ .07 .07 .07 ]"
    $phong 1
    $phongexponent	2
    $phongfresnelranges "[ .2 .5 1 ]"
    $phongalbedotint 1.0
    $phongboost 1.0
    $phongalbedoboost 10.0
}
How to submit your stickers to the Counter-Strike workshop
Once you have completed your stickers, you can submit your VMTs and source art (PSD and TGA) files to the Counter-Strike workshop via the Workshop Item Publisher, located in the CS2 SDK.
Sticker submissions must include at least two of the available sticker styles. This is to ensure we represent an interesting range of sticker rarity. It’s up to you what the different sticker styles look like, but this means that at least two sets of VMT files and textures are necessary for a valid submission.
For example, a valid submission might include a standard-paper-backed sticker version ($decalstyle 1) and a holographic version ($decalstyle 3). Another valid submission may include a standard glossy version ($decalstyle 0) and a foil version ($decalstyle 4). If your workshop submission includes a version of your sticker in all possible styles, that’s even better!